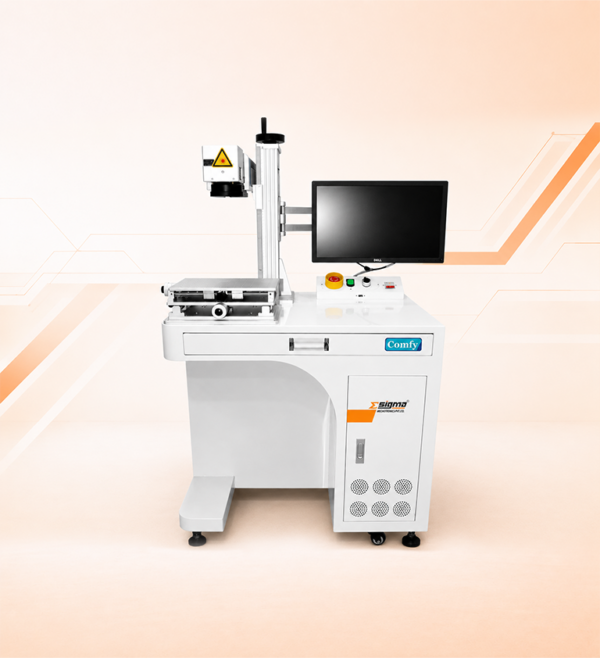
Fiber Laser Marking System
Fiber Laser Marking System by Sigma Mechotronics delivers fast,
high-precision and permanent marking on metals and selected
non-metal materials.
– Power options: 20W, 30W and 50W
– Marking areas: 150×150, 175×175, 200×200 and 300×300 mm
– Floor-standing cabinet with integrated monitor and control panel
– Marks QR codes, barcodes, serial numbers and logos
– Air cooled, no consumables required
Send Inquiry
Desktop Workstation · Permanent Marking · Made in India · ISO 9001:2015 Certified
Fiber Laser Marking System – Desktop Workstation for Permanent Marking on Metal and Plastic, 20 W to 50 W
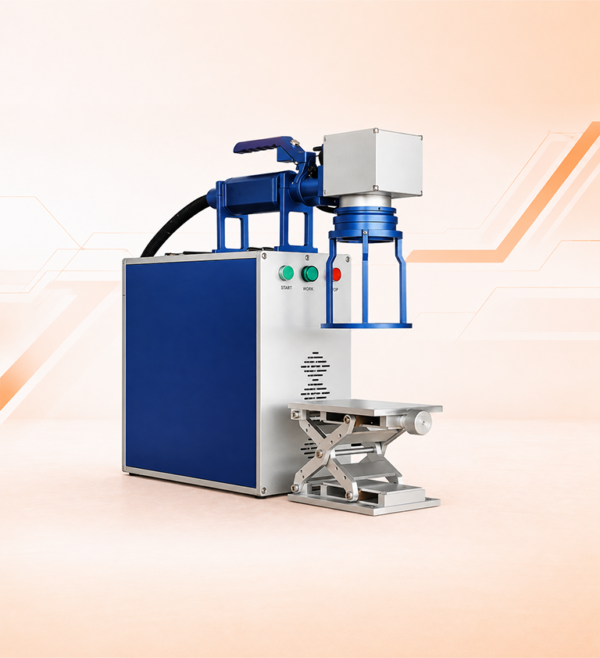
A fiber laser marking system is a fixed workstation that steers a focused laser beam across a part with a galvo scanning head, changing the surface itself to leave a permanent mark – no ink, no stencil and no contact with the part. This is the bench configuration: laser source, galvo head and control electronics in one cabinet, with a motorised Z-axis table that sets focus height to the part in front of it. Sigma Mechotronics Pvt. Ltd. builds it from 20 W to 50 W, with marking areas of 150 x 150, 175 x 175, 200 x 200 and 300 x 300 mm. Because the part comes to a fixed station rather than the machine going to the part, it gives the most repeatable mark positioning in the marking range – which is what barcode, QR and serial-number work actually depends on.
- Power range
- 20 W – 50 W
- Marking areas
- 4
- Largest field
- 300 x 300 mm
- Mark types
- 5
Most manufacturers arrive at laser marking because something else stopped being good enough. Ink smudges or wipes off in oil. Stickers peel. Dot-peen is slow, noisy and too coarse for a data-matrix code. Etching stock takes chemicals and disposal. A fiber laser removes all of that: the mark is a change in the metal itself, produced without touching the part, with nothing applied to the surface and no stylus to wear out. The lens is what you plan for – it is cleaned regularly and replaced when it degrades.
What makes the desktop configuration specifically worth having is repeatability. Because the part is located on a fixed table and the head does not move between jobs, the mark lands in the same position on the first part and the five-thousandth. That is the difference between a code a scanner reads every time and a code that fails on the line – and it is why this configuration, rather than a handheld or a mobile one, is what production and traceability work is built around. Sigma Mechotronics Pvt. Ltd. manufactures it at its own plant in Ahmedabad.
At a Glance
Key Takeaways
Built for Repeatability
A fixed table and a motorised Z-axis put the mark in the same place every cycle – what barcode, QR and serial-number work depends on.
20 W to 50 W
Lower power covers surface marking at standard speeds; higher power is for deep engraving, hard tool steel and faster line cycles.
Four Marking Areas
150 x 150, 175 x 175, 200 x 200 and 300 x 300 mm. The field size is fixed at purchase, so choose it against your largest part.
No Ink, Ribbon or Stencil
Nothing is applied to the part and no stylus wears out. The lens is the consumable to plan for – cleaned regularly and replaced when it degrades.
Five Different Mark Types
Etching, annealing, deep engraving, ablation and foaming – the same machine, different parameters, very different results.
Rotary Axis Is an Option
For 360° marking on rings, shafts, tubes and fasteners. Specify it with the order rather than retrofitting later.
Definition
What Is a Fiber Laser Marking System?
A fiber laser marking system generates a beam inside a ytterbium-doped fiber source and steers it across the part using a galvo scanning head – two mirrors on high-speed motors that deflect the beam through an F-Theta lens. Nothing touches the part. Depending on power, frequency and pulse settings, the surface is etched, annealed, ablated or foamed, and the result is permanent: it cannot be wiped, washed or peeled off.
The desktop configuration puts the source, the galvo head and the control electronics into one cabinet with a motorised Z-axis table. The Z-axis matters more than it sounds – the beam has one correct focal height, and a part 5 mm thicker than the last one needs the head raised by 5 mm or the mark comes out weak and blurred. A motorised table sets that height as part of the job rather than by hand, which is what lets a mixed-thickness batch run without an operator judging focus by eye each time.
It marks mild and carbon steel, stainless steel, aluminium including anodised finishes, brass, copper and titanium, plus select engineering plastics. Because it is a fixed station, the practical limit is what you can carry to it: parts small and light enough to load onto the table. Oversized or installed items are what the hand-held and portable configurations exist for.
Four Field Sizes
Marking Area: How to Choose the Field Size
The marking area is the square the galvo head can reach without the part being moved. It is set by the F-Theta lens fitted at purchase, so it is a decision you make once – and there is a real trade-off in it rather than “bigger is better.”
| Marking Area | Typically Suits | Practical Note |
|---|---|---|
| 150 x 150 mm | Small components, fasteners, tools, instruments, jewellery and precision parts | The smallest field concentrates the same power into a smaller area, so it gives the finest detail – the right choice for small data-matrix codes and tiny text. |
| 175 x 175 mm | Small to mid-size parts where 150 mm is just short of comfortable | A modest step up that buys fixturing margin without giving away much detail resolution. |
| 200 x 200 mm | Mid-size components, nameplates, valve bodies, housings and control panels | The common all-round choice, and large enough to jig several small parts and mark them in one cycle. |
| 300 x 300 mm | Large nameplates, panels, sheet blanks and full trays of small parts | The largest field. Best used deliberately for large marks or high-count batch trays rather than as a default. |
The trade-off worth understanding – the beam spreads the same energy over a larger square as the field grows, so a bigger field generally means a slightly larger focused spot and less fine detail. Pick the smallest field that comfortably covers your largest mark, not the largest field available. The exception is batch marking: if you can jig twenty small parts on a tray and mark them in one cycle, the larger field pays for itself in handling time rather than in mark quality.
20 W to 50 W
How to Choose the Power
Power is decided by what you are doing to the surface, not by what material it is. Marking a serial number onto stainless steel and engraving a cavity into hardened tool steel are different jobs, and that difference – surface mark or material removal – is what sets the wattage.
| Power | Generally Suits | Where It Struggles |
|---|---|---|
| 20 W | Surface marking on metals and plastics at standard speeds – serial numbers, barcodes, QR codes, logos and batch codes | Deep engraving, hardened tool steel and the shortest cycle times on a fast line |
| 30 W | The general-purpose middle – surface marking with more speed in hand, and shallow engraving | Genuine depth work on hard materials |
| 50 W | Deep engraving to measurable depth, hardened tool steel, mould and die marking, and high-throughput production lines | Nothing within the range – it is capital cost, so buy it where depth or cycle time demands it |
A useful way to decide – if the mark only has to be seen and scanned, 20 W does it. If the mark has to survive abrasion, machining, heat treatment or overpainting – so it must have depth rather than contrast – move up the range. If cycle time on a production line is the constraint, higher power finishes the same mark faster.
One Machine, Five Results
The Mark Types the Same System Can Produce
Changing power, frequency and pulse width changes what happens at the surface. Knowing which of these you need is more useful than any headline specification, because it decides both the power tier and how the job is set up.
| Mark Type | What Happens | Typical Use |
|---|---|---|
| Surface Etching | Removes a few microns of surface – fast, high contrast | Barcodes, QR codes and serial numbers on metal |
| Annealing | Oxidises the surface below melting point – no material removed, surface stays smooth and sealed | Stainless steel and titanium for food, pharma, medical and surgical instruments |
| Deep Engraving | Multiple passes remove material to measurable depth | Tooling, die marking, and marks that must survive abrasion or overpainting |
| Ablation | Removes a coating or plating layer to reveal the base material underneath | Anodised aluminium, painted, plated and powder-coated surfaces |
| Foaming / Carbonisation | Causes a colour-change reaction in the polymer surface | Dark or filled engineering plastic housings and components |
Annealing is the one to know about – because it does not remove material, it leaves the surface smooth and unbroken. That matters on stainless steel for food, pharmaceutical, medical and surgical work, where an etched groove can hold residue and complicate cleaning. If your parts are washed down or have to meet hygiene requirements, ask for annealing specifically – it is a parameter set, not a different machine.
The One Option to Decide Early
The Rotary Axis Attachment
A rotary axis is a chuck that grips a cylindrical part and turns it under the beam in coordination with the galvo head, so a mark can run continuously around the full circumference instead of stopping where the flat field ends. It is specified with the machine at purchase.
Without it, marking a ring or a shaft means marking one face, releasing the part, rotating it by hand, re-fixturing and marking again – with a visible join where the two passes meet and a positional error each time. With it, the mark is one continuous pass: full 360° text around a ring, a scale down the length of a shaft, a logo wrapped around a tube, or batch marking on fasteners.
The reason to decide it now rather than later is cost. Adding a rotary axis to a machine already on your floor is meaningfully more expensive than including it in the original order, and the fixturing is matched to the machine at build. If rings, shafts, bolts, tubes or any round part are a regular part of your work, put it on the order.
The Marking Range
How This Sits Against Our Other Marking Machines
All three configurations in the fiber laser marking machine range mark the same materials in the same 20 W to 50 W band. What separates them is one question: does the part come to the machine, or does the machine go to the part?
| Configuration | How It Works | Built For |
|---|---|---|
| Desktop System | Fixed workstation with a motorised Z-axis table; the part is loaded onto it | Batch and line-side marking where positional repeatability decides whether codes scan |
| Hand-Held Marking | Handheld head on a cable, carried to the part by the operator | Field marking, asset tagging and installed equipment that cannot be moved |
| Portable Marking | Head on a height-adjustable column with a movable base, wheeled to the work | Large fabricated assemblies, heavy castings and structural work too big to lift onto a bench |
Four Checks
How to Specify the Right System
- 1
Decide the Mark Type Before Anything Else
Surface mark, anneal, deep engrave or ablate a coating – this one answer drives the power tier and the parameters. A code that only has to scan is a different machine decision from a mark that has to survive machining and heat treatment.
- 2
Measure Your Largest Mark, Then Your Largest Part
The field has to cover the mark, and the table has to take the part. Choose the smallest field that comfortably covers your largest mark – unless you intend to jig multiple parts per cycle, in which case size the field for the tray.
- 3
Check Whether Any of Your Parts Are Round
Rings, shafts, tubes, bolts and any part needing a mark that wraps around it mean the rotary axis attachment. Deciding this at the order stage costs far less than retrofitting it.
- 4
Plan the Bench, the Extraction and the Software Side
The machine needs a stable bench, a power point and fume extraction where you mark coated, painted or plastic parts. Also settle early how mark data reaches the machine – fixed artwork, incrementing serial numbers, or codes pulled from a file – because that is how it will be used every day.
Avoid These Buying Mistakes
6 Mistakes Buyers Make on a Marking System
1
Ordering the largest marking field by default. A bigger field spreads the same energy over more area and gives slightly coarser detail. Buy the smallest field that comfortably covers your largest mark.
2
Skipping the rotary axis, then needing it three months later. Retrofitting costs more than including it. If any regular part is round, put it on the original order.
3
Buying 20 W for work that actually needs depth. Surface contrast and engraved depth are different jobs. A mark that must survive abrasion, machining or overpainting needs the higher end of the range.
4
Etching stainless parts that should have been annealed. On food, pharma, medical and washdown work an etched groove can trap residue. Annealing leaves the surface sealed – ask for it by name.
5
Assuming no fume extraction is needed because there is no smoke. Marking coated, painted and plastic parts vaporises the surface layer. Extraction appropriate to what you mark is part of the installation.
6
Not testing on your own material and finish. Mark contrast varies with grade, surface finish and coating far more than buyers expect. A sample trial on your actual parts is the only reliable confirmation.
Where It Is Used
Industries and Applications
Used wherever a part has to carry an identity that survives the rest of its life – and increasingly, wherever a customer or a regulator asks for traceability.
- Automotive & Auto-Ancillary
- Medical Device & Surgical Instruments
- Electronics & PCB Manufacturing
- Tool, Mould & Die Manufacturing
- Fastener & Hardware Manufacturing
- Pump, Valve & Industrial Engineering
- Jewellery & Precious Metal
- Electrical Panel & Switchgear
- Packaging & FMCG Lines
- Defence & Aerospace Components
Typical output is serial numbers, batch and date codes, barcodes and QR or data-matrix codes, part numbers, logos, branding, nameplates, scales and dials, and compliance or traceability marks. Materials are mild and carbon steel, stainless steel, aluminium including anodised finishes, brass, copper and titanium, plus dark or filled engineering plastics. Fiber laser marks metals extremely well; for cutting non-metals such as acrylic or plastic sheet, a CO2 laser is the correct machine rather than this one.
Keeping It Running
Maintenance and Safety in Practice
There is no assist gas and no nozzle to replace on a marking system, so the list is short. What it does need is optical cleanliness, and the lens is the consumable to budget for.
| Routine Task | Typical Frequency |
|---|---|
| Lens cleaning, and replacement when it degrades | Cleaning periodically, sooner in a dusty or oily workshop – a dirty or worn lens shows up as a weak, uneven mark |
| Galvo mirror and optical path check | Periodic, per usage environment |
| Z-axis and table cleaning, fixture check | Regular – debris on the table changes the focal height without anyone noticing |
| Extraction and filter check, full technical inspection | Extraction regularly where coated or plastic parts are marked; inspection annually |
Safety, in practice: the beam is invisible at the fiber wavelength and reflects readily off bright metal, so wavelength-rated eye protection is required for anyone in the working area, not only the operator. Where the machine is supplied with a safety enclosure or interlocks, they are there to stop the beam firing in an unsafe condition and must never be bypassed for convenience. Fume extraction is needed wherever coated, painted, plated or plastic parts are marked, because the process vaporises that surface layer. The consumable to budget for in normal operation is the lens.
Manufacturer, Not Trader
Why Buy This System From Sigma Mechotronics Pvt. Ltd.
Built in India
The machine is manufactured at our own Ahmedabad plant rather than imported and rebadged, so the power tier, the field size and the rotary axis are specified with the people who build it – not through an overseas supplier.
ISO 9001:2015 Certified, MSME Registered
Sigma Mechotronics Pvt. Ltd. is a registered Indian private limited company, GST registered, ISO 9001:2015 certified and MSME registered. Every purchase comes with a proper GST tax invoice under your GSTIN.
Spares and Service Held in India
Galvo scanning heads, lenses and control boards are held and sourced locally rather than ordered on an international shipping cycle, and the organisation you call for support is the one that built your machine.
Installation, Parameters and Training
We install and commission the system at your premises, develop parameter sets for your actual materials and mark types, and train your operators on the software and on safe working before handover.
Straight Answers
Frequently Asked Questions
Yes, because the mark is a change in the material itself rather than something applied on top of it. There is no ink to smudge, no label to peel and no coating to wear off. How well it survives depends on the mark type you choose: a surface etch or anneal is permanent under normal handling, washing and oil, while a mark that has to survive abrasion, machining, heat treatment or being painted over should be deep engraved so it has physical depth rather than only contrast.
Choose the smallest field that comfortably covers your largest mark. 150 x 150 mm suits small components, fasteners, tools and jewellery and gives the finest detail; 175 x 175 mm adds fixturing margin; 200 x 200 mm is the common all-round size for mid-size parts and nameplates; 300 x 300 mm suits large nameplates, panels and full trays of small parts. The field is set by the lens fitted at purchase, so it is a one-time decision – the exception to “smallest is best” is batch marking, where a larger field lets you jig many parts and mark them in one cycle.
It depends on whether you are marking the surface or removing material. 20 W covers surface marking on metals and plastics at standard speeds – serial numbers, barcodes, QR codes, logos and batch codes. 50 W is for deep engraving to measurable depth, hardened tool steel, mould and die work, and for finishing the same mark faster on a high-throughput line. 30 W sits in between. If the mark only has to be seen and scanned, the lower end does it.
Mild and carbon steel, stainless steel, aluminium including anodised finishes, brass, copper and titanium, plus dark or filled engineering plastics. Metals are where fiber laser marking is strongest. Anodised, painted, plated and powder-coated surfaces are marked by ablation, which removes the coating to reveal the base material underneath. It is not the right machine for cutting non-metals – for acrylic and plastic sheet cutting, a CO2 laser is the correct technology.
Annealing oxidises the surface below melting point to produce a dark mark without removing any material, so the surface stays smooth and sealed. Ask for it on stainless steel and titanium parts used in food, pharmaceutical, medical and surgical applications, or anything that gets washed down – an etched groove can hold residue and complicate cleaning, whereas an annealed mark leaves nothing to trap. It is a parameter set on the same machine, not a different machine.
Yes, with the rotary axis attachment. It grips the part in a chuck and turns it under the beam in coordination with the galvo head, so text or a logo runs continuously around the full 360° instead of stopping where the flat field ends. Without it you would mark one face, re-fixture by hand and mark again, leaving a visible join and a positional error. Specify the rotary axis with the original order – adding it later costs meaningfully more.
Fiber laser marking is non-contact, so there is no stylus force on the part and no tool to wear out, and nothing is applied to the surface – no ink, ribbon, stencil or chemical. The consumable here is the lens, cleaned regularly and replaced when it degrades. It resolves far finer detail than dot-peen, which matters for small data-matrix codes, and the mark cannot be wiped off the way ink can. Dot-peen still has a place where deep impact marking on rough surfaces is wanted, and inkjet where the code is meant to be temporary.
The consumable to budget for is the lens – cleaned regularly and replaced when it degrades. There is no assist gas, no nozzle and no ink, so beyond the lens the running cost is essentially electricity. The rest of the maintenance is optical and mechanical: clean the lens more often in a dusty or oily workshop, since a dirty or worn one shows up as a weak uneven mark; periodic galvo mirror and optical path checks; keep the Z-axis and table clean, because debris under a part changes the focal height without anyone noticing; extraction filter checks; and an annual technical inspection.
The beam is invisible at the fiber wavelength and reflects readily off bright metal, so wavelength-rated eye protection is required for everyone in the working area rather than the operator alone. Where a safety enclosure or interlocks are supplied, they exist to stop the beam firing in an unsafe condition and must never be bypassed. Fume extraction is required wherever coated, painted, plated or plastic parts are marked, since the process vaporises that surface layer. We cover the full safety setup during installation.
Price depends on the power tier, the marking area fitted and whether the rotary axis attachment is included – a 20 W system with a 150 x 150 mm field and a 50 W system with a 300 x 300 mm field and a rotary axis sit at different points in the range. We quote against a confirmed specification rather than publishing a fixed figure, because the right configuration depends on your parts and mark type. Send your material, part size, mark type and whether any parts are round for a detailed quotation.
Yes, and on a marking machine we strongly recommend it. Mark contrast varies with material grade, surface finish and coating far more than most buyers expect, and a sample on your actual parts is the only reliable way to confirm the result before committing. Send or bring the parts you intend to mark along with the mark type you need – and if the code has to be machine-readable, bring your scanner too. Facility visits to our Ahmedabad plant are welcome by appointment.
The Full Range
Related Machines From Sigma Mechotronics Pvt. Ltd.
Get a Marking System Specified for Your Parts
Send us the material and finish you mark, the size of your largest mark and your largest part, what the mark has to survive, and whether any of your parts are round. Our team will confirm the power tier, the marking area and whether the rotary axis belongs on your order, and come back with a specification and quotation built around your actual parts.

Reviews
There are no reviews yet.